Apigee Tutorial
A tutorial on building secure services via continuous delivery. Cheap.
Automated Deployment
In the last section, we enhanced our build and created a pipeline in Snap so our tests would run on every commit. Now we move to the next stage and push our code out to the live server. So, I’m going to start with some caveats.
Heroku is great in many ways. It’s VERY easy to pull code off your public repo, build it (if it isn’t too large) and then have it deployed within minutes. It’s free for small test instances, and seems fairly affordable. But, honestly, it doesn’t seem to be built for compiled apps or for large continuous delivery deployments for the following reasons:
- the path of least resistance is to pull your source code from git, build it on the heroku machine and run. This means burning cycles (and dollars) building your app again. Maybe not a big deal if you are in ruby, but not ideal in Java. It also means for Java that we would be breaking the sacred continuous deployment rule of not re-building our binaries.
- there is a time-limit on builds. If you’re app doesn’t build in under 15 minutes, it’s going to time out. A 15 minutes build is, admittedly pretty long, but if you are pulling down a lot of artifacts over the big, bad, unpredictable Internet, this isn’t out of the question. A bunch of small microservice are probably fine, but a big monolithic app wouldn’t be ideal.
- which brings us to another point. This is really meant for public repos, or possibly private repos on a public site. If you have a private repository behind your firewall, I expect you are out of luck.
So here’s what we’re going to do: we built that zip file, so we’re going to use it.
Build Script Modifications
If we were going to do this the low-friction, non-CD rebuild-the-source-again way, this would be really, really easy. But we’re better than that. We’re going to make this more CD-friendly, and more scalable. First thing we need is a place to put this zip file. If this was a corporate network, I would recommend using an internal artifact repo of some kind. If this was AWS, I would suggest an S3 bucket. We’re going to use Bintray–again because it has a simple API, it’s free for basic open source projects, and it doesn’t require you to wait after registering.. Really, though, any artifact repo would do the job.
At this point in the development of the build script, I’m at the point that I just can’t take the clutter anymore, so I’m moving all things that aren’t directly related into external script files. I like the gradle file filled with task definitions, rather than utility functions. So if some functions disappeared, look for them in the BuildUtils.groovy file.
Versioning
Now that this thing has reached the outside world, it makes sense to be a bit more attentive to versioning. First thing we’re going to do is automate the versioning process so we don’t have remember to change the number every time. We can still have a main semantic version, but we’ll tack build numbers on the end. We don’t care about versions when we’re building locally, so we’ll just generate build numbers when we build in the pipeline.
In the main build file, add a call to generateVersion():
...
  sourceCompatibility = 1.8
  version = generateVersion()
  mainClassName = "helloService.HelloServiceMain"
  repositories {
    mavenCentral()
  }
...and we implement that in BuildUtils:
...
def static generateVersion() {
  def versionNumber = '1.0.0'
  def buildName = System.getenv("CI") == 'true' ? System.getenv("SNAP_PIPELINE_COUNTER") : "DEV"
  "$versionNumber-$buildName"
}
...If the Snap-supplied “CI” environment variable is true, that indicates we should use the Snap pipeline counter for generating build numbers. Otherwise, we just add “DEV” to the end, indicating a development build that should never be published.
Uploading the Artifact
Rather than rebuild the artifact and introduce the risk that the artifact differs in some way when compiled on a different machine, we’re going to practice good CD, stash the zip file in a repo, in this case, a public one, and then download it onto our deployment machine. There are a number of enhancments we could do to make this more robust and better documented, but for now we’re going to deliver the minimum viable functioning product and update it as we need to.
We are going to upload this to Bintray, acting as a maven repo, so we want to add a new section to our build script and add a new plugin.
...
apply plugin: 'maven-publish'

...

publishing {
  publications {
    mavenJava(MavenPublication) {
      artifact(distroPath)
    }
  }

  repositories {
    maven {
      url "https://api.Bintray.com/maven/danielsomerfield/maven/apigee-tutorial"
      credentials {
        username = System.getenv("Bintray_USERNAME")
        password = System.getenv("Bintray_PASSWORD")
      }
    }
  }
}

publish {
  doLast {
    bintrayPublish(version)
  }
}First, we apply the maven publish plugin, then define our repos. Bintray requires the repo to point to their REST api. We are going to pull credentials from environment variables while in the pipeline. Although you generally don’t want to be publishing development version, you can always set these variables on your local machine for testing purposes.
We also add an additional configuration closure for Bintray. In many repos this wouldn’t be necessary, but Bintray requires an upload step, then a publish step. We could use the Bintray UI to do it, but that’s not very CD, so we’re going to add that publish step to our automation.
The new PublishUtils.groovy script has the implementation of this publish function.
...
def static BintrayPublish(version) {
  def bintrayPublishURL = "https://api.Bintray.com/content/danielsomerfield/maven/apigee-tutorial/${version}/publish"

  HttpPost post = new HttpPost(BintrayPublishURL)
  CredentialsProvider credsProvider = new BasicCredentialsProvider();
  credsProvider.setCredentials(
    new AuthScope(null, -1),
    new UsernamePasswordCredentials(
      System.getenv("Bintray_USERNAME"),
      System.getenv("Bintray_PASSWORD")
    )
  );

  HttpClients.custom().setDefaultCredentialsProvider(credsProvider).build().withCloseable { client ->
    client.execute(post).withCloseable() { response ->
      if (response.statusLine.statusCode != 200) {
        throw new GradleException("Bintray publish receive status code ${response.statusLine.statusCode}.")
      }
    }
  }
}All this does is POST to the Bintray REST API to move the artifact to a published state so it can be accessed. Note that if you set up your Bintray account with a different product name (apigee-tutorial) or repo name (maven–available by default), you will have to tweak the URL to reflect that. At minimum, you will have to change the URL to reflect your own account name (danielsomerfield in mine, above).
Downloading the Artifact
Now we shift from uploading the artifact to the repo, to downloading the artifact to the destination box. For this we are going to create an entirely new, albeit very small, gradle sub-project. You can see there is a new deploy/ directory containing nothing but a build.gradle file. The files looks a little something like this:
apply plugin: 'groovy'

repositories {
  maven {
    url "http://dl.Bintray.com/danielsomerfield/maven"
  }
}

dependencies {
  runtime 'com.danielsomerfield:apigee_tutorial:+'
}

task deploy(type: Copy) {
  configurations.runtime.collect {
    from zipTree(it)
  }

  into {"build/deployment"}
}

task stage (dependsOn:'deploy') {
}This script is going to run on the actual heroku deployment box. Heroku expects a stage task. The one we have here doesn’t do anything on its own right, but forces the deploy task to run via dependencies. You don’t really have to do it that way, but I like having the deploy named semantically, and then have the stage require it, since it’s only there as “glue” for heroku.
You will notice the runtime dependency is pointing at our main project, deploy. This forces it to download from the repo, then the deploy task unzips it into the build/deployment directory.
We’ve also added a Heroku Procfile to the root of the master project which, as the name implies, defines the process to be run when the application is started.
web: HELLO_SERVICE_PORT=$PORT deploy/build/deployment/apigee_tutorial-*/bin/apigee_tutorialAll that says is that when the web project runs, execute the apigee_tutorial script with the given HELLO_SERVICE_PORT environment variable. We set that to $PORT which is an environment variable that Heroku provides.
And Finally …
Finally, we add a target that runs smoke tests so, after the application deploys, we can tell for sure that it’s up. Depending on how you are deploying, and to where, the timeout might be too short.
This is where we get the payoff for not hard-coding URLs in the tests. We can take a subset of our user acceptance tests, and run them against the deployment target to make sure all looks good. In our case, we only have one UA test, so we could just run that target again, but for the sake of demonstration, I am creating a suite that includes that test. There are a lot of ways to achieve this same thing, including tagging tests with labels, but I chose the suite method because it’s easy and it seems to be the easiest to do with gradle.
The new target will look like this:
...
  task smokeTest(type: Test) {
    include '**/*SmokeTest.*'
    doFirst {
      waitForPing(60 * 1000)
    }
  }
...And the test suite class will look like this:
...
@RunWith(Suite.class)
@SuiteClasses([HelloServiceUATest.class])
class HelloServiceSmokeTest {

}In my case, it doesn’t have any new tests, but includes the one UA test. If I wanted other tests, I would add test functions here, or else add other classes to the SuiteClasses annotation.
Finally, our gradle script is completely configured for CD. But we still need to set up Bintray and Heroku.
Setting up the Repository
First step is to set up an account on Bintray. I don’t love Bintray, particularly because the document is, at best, spotty. If you want to use another repo, including your own, you just need to make sure it can act as a maven repo, or ivy, if you are willing to do some light hacking with this tutorial. If you don’t use Bintray, you can also remove the bintrayPublish call or else replace it if the repo you uses requires a similar publish step.
Next you have to manually add a product. I hate manual steps, but this is a one-time-thing. Out of the box, you will have a repo in your account called “maven” for maven repos. You want to add your product here.
- Log into your account
- Click on the “maven” link under “Owned Repositories”.
- Click on “Add New Package”
- Fill out the package details form. The only thing that really matters here is the name. You can call it something other than “apigee-tutorial”, but know that if you do, you’ll need to change the name of the package in the gradle scripts.
That’s it. None of the other stuff really matters. If you look at the docs, it will say you need to add versions, but don’t worry about it. Our pipeline will take care of that.
Setting up Heroku
This is a bit of a non-step, insofar as all you have to do is sign up for an account. Snap will do the provisioning of the apps. So, sign up at heroku.com, and then pop over to Snap to set up the connections to Heroku and Bintray.
Setting up Snap
By the end of the last section, we had three build steps: the git hub clone, test, and UAT. Now we’re going to add three more.
Publish Step
Setting up the publish step, is very similar to setting up the other steps, except we’re going to take advantage of the environment variables so we can set credentials.
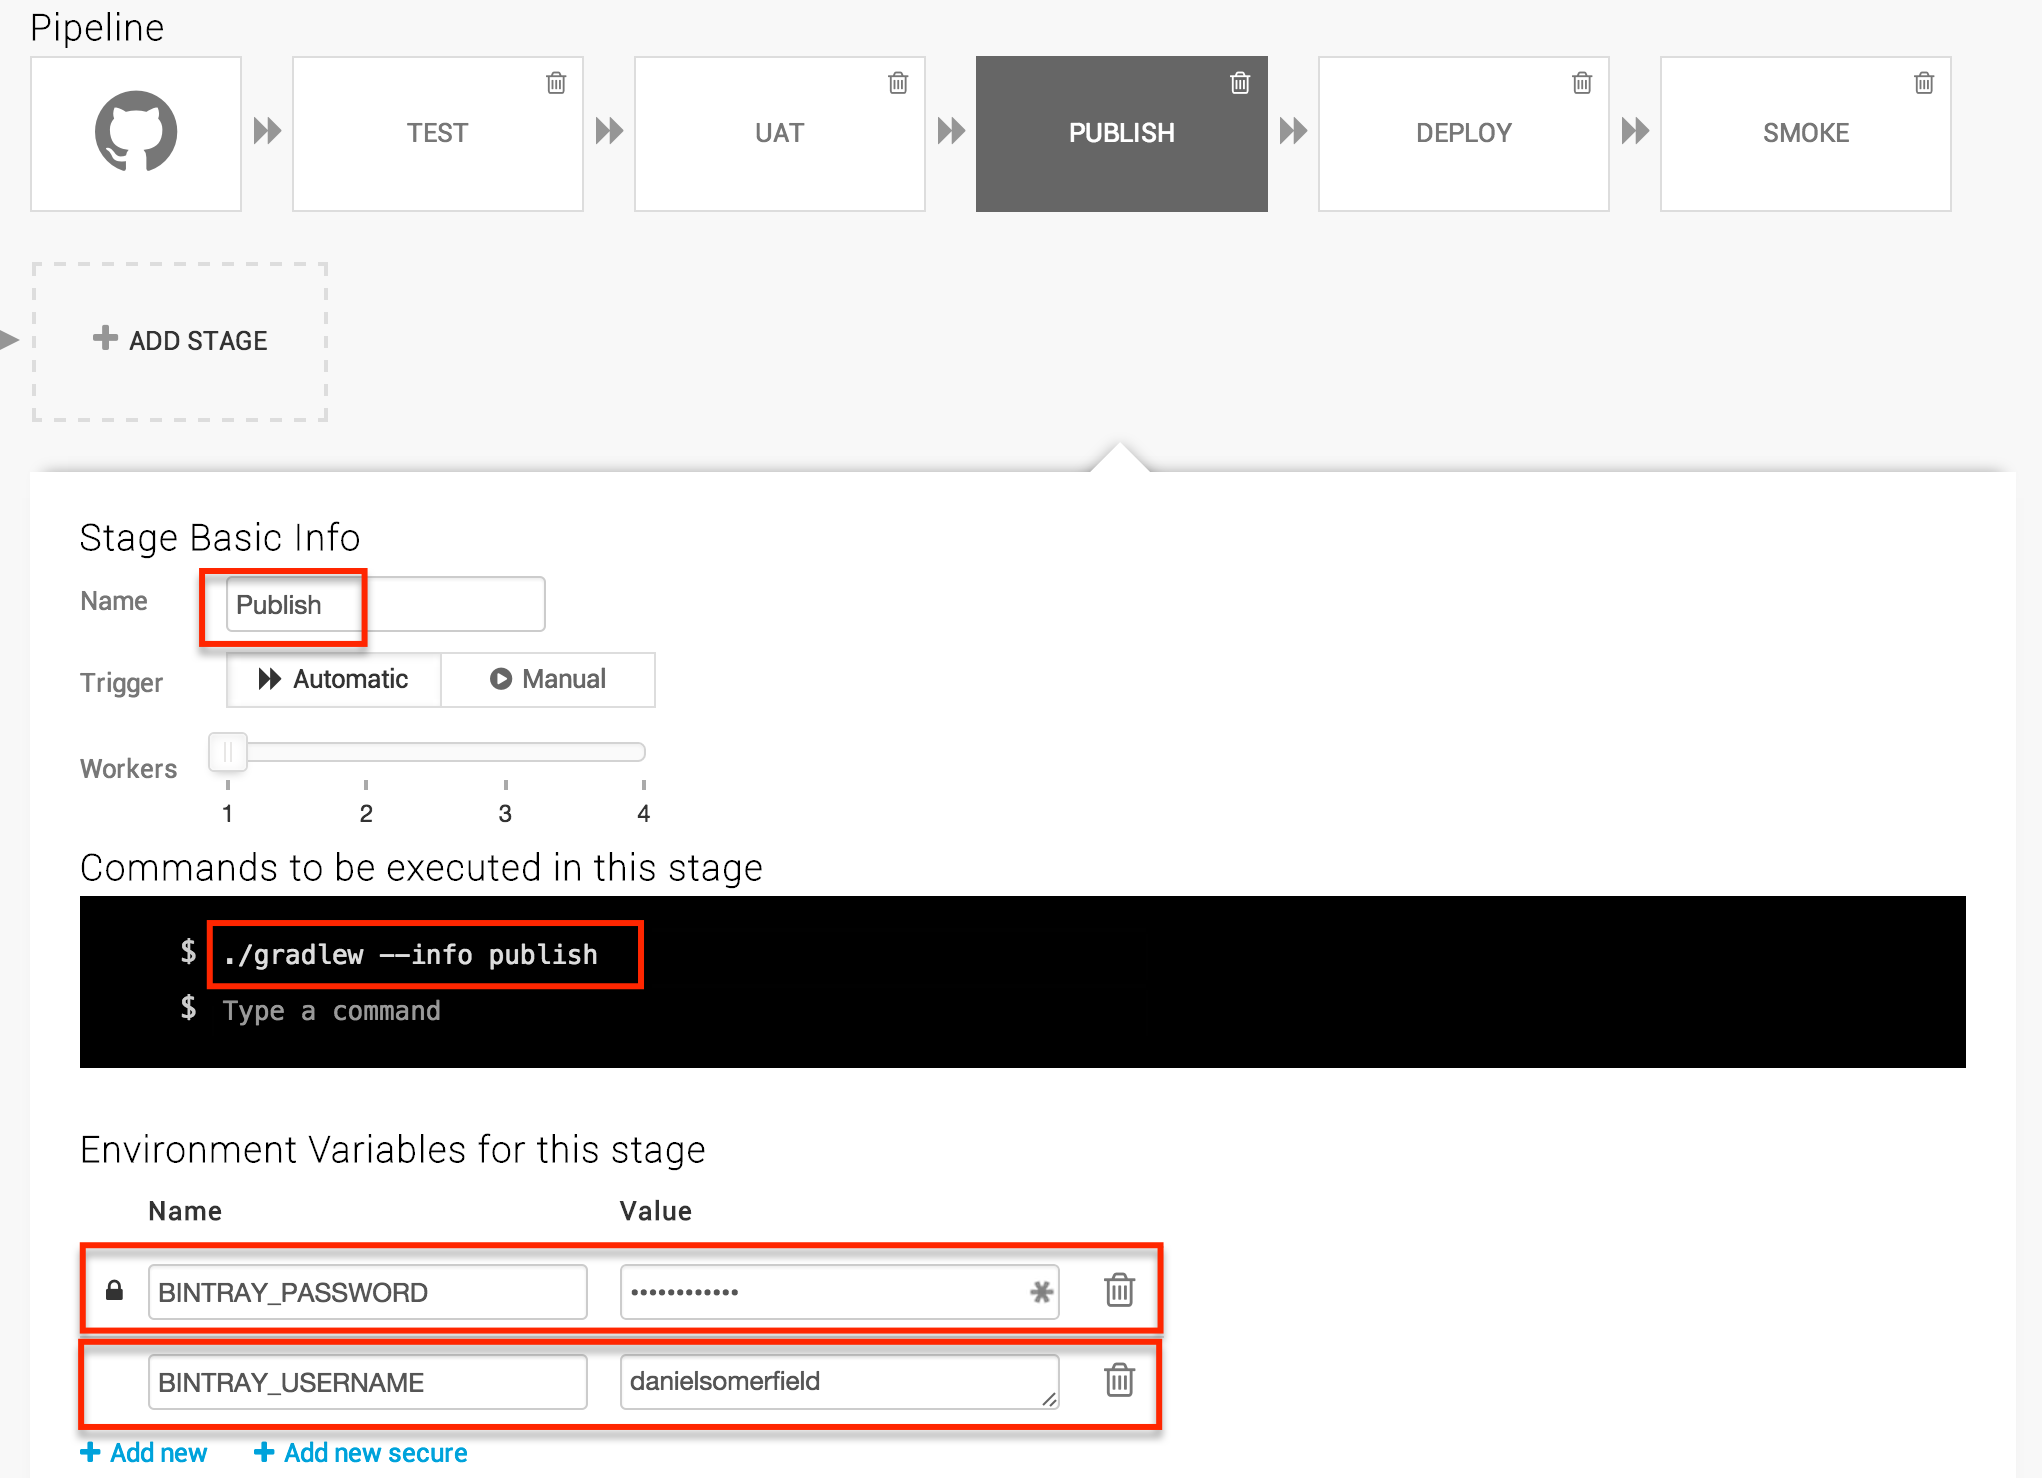
For the username, we can use the + Add new button, and for the password, the + Add new secure. You will notice in the screenshot, I added --info to this step. In fact, in the process of debugging, I added it to all my ./gradlew calls for more useful logs. If you need to debug, you can increase the log level further to --debug.
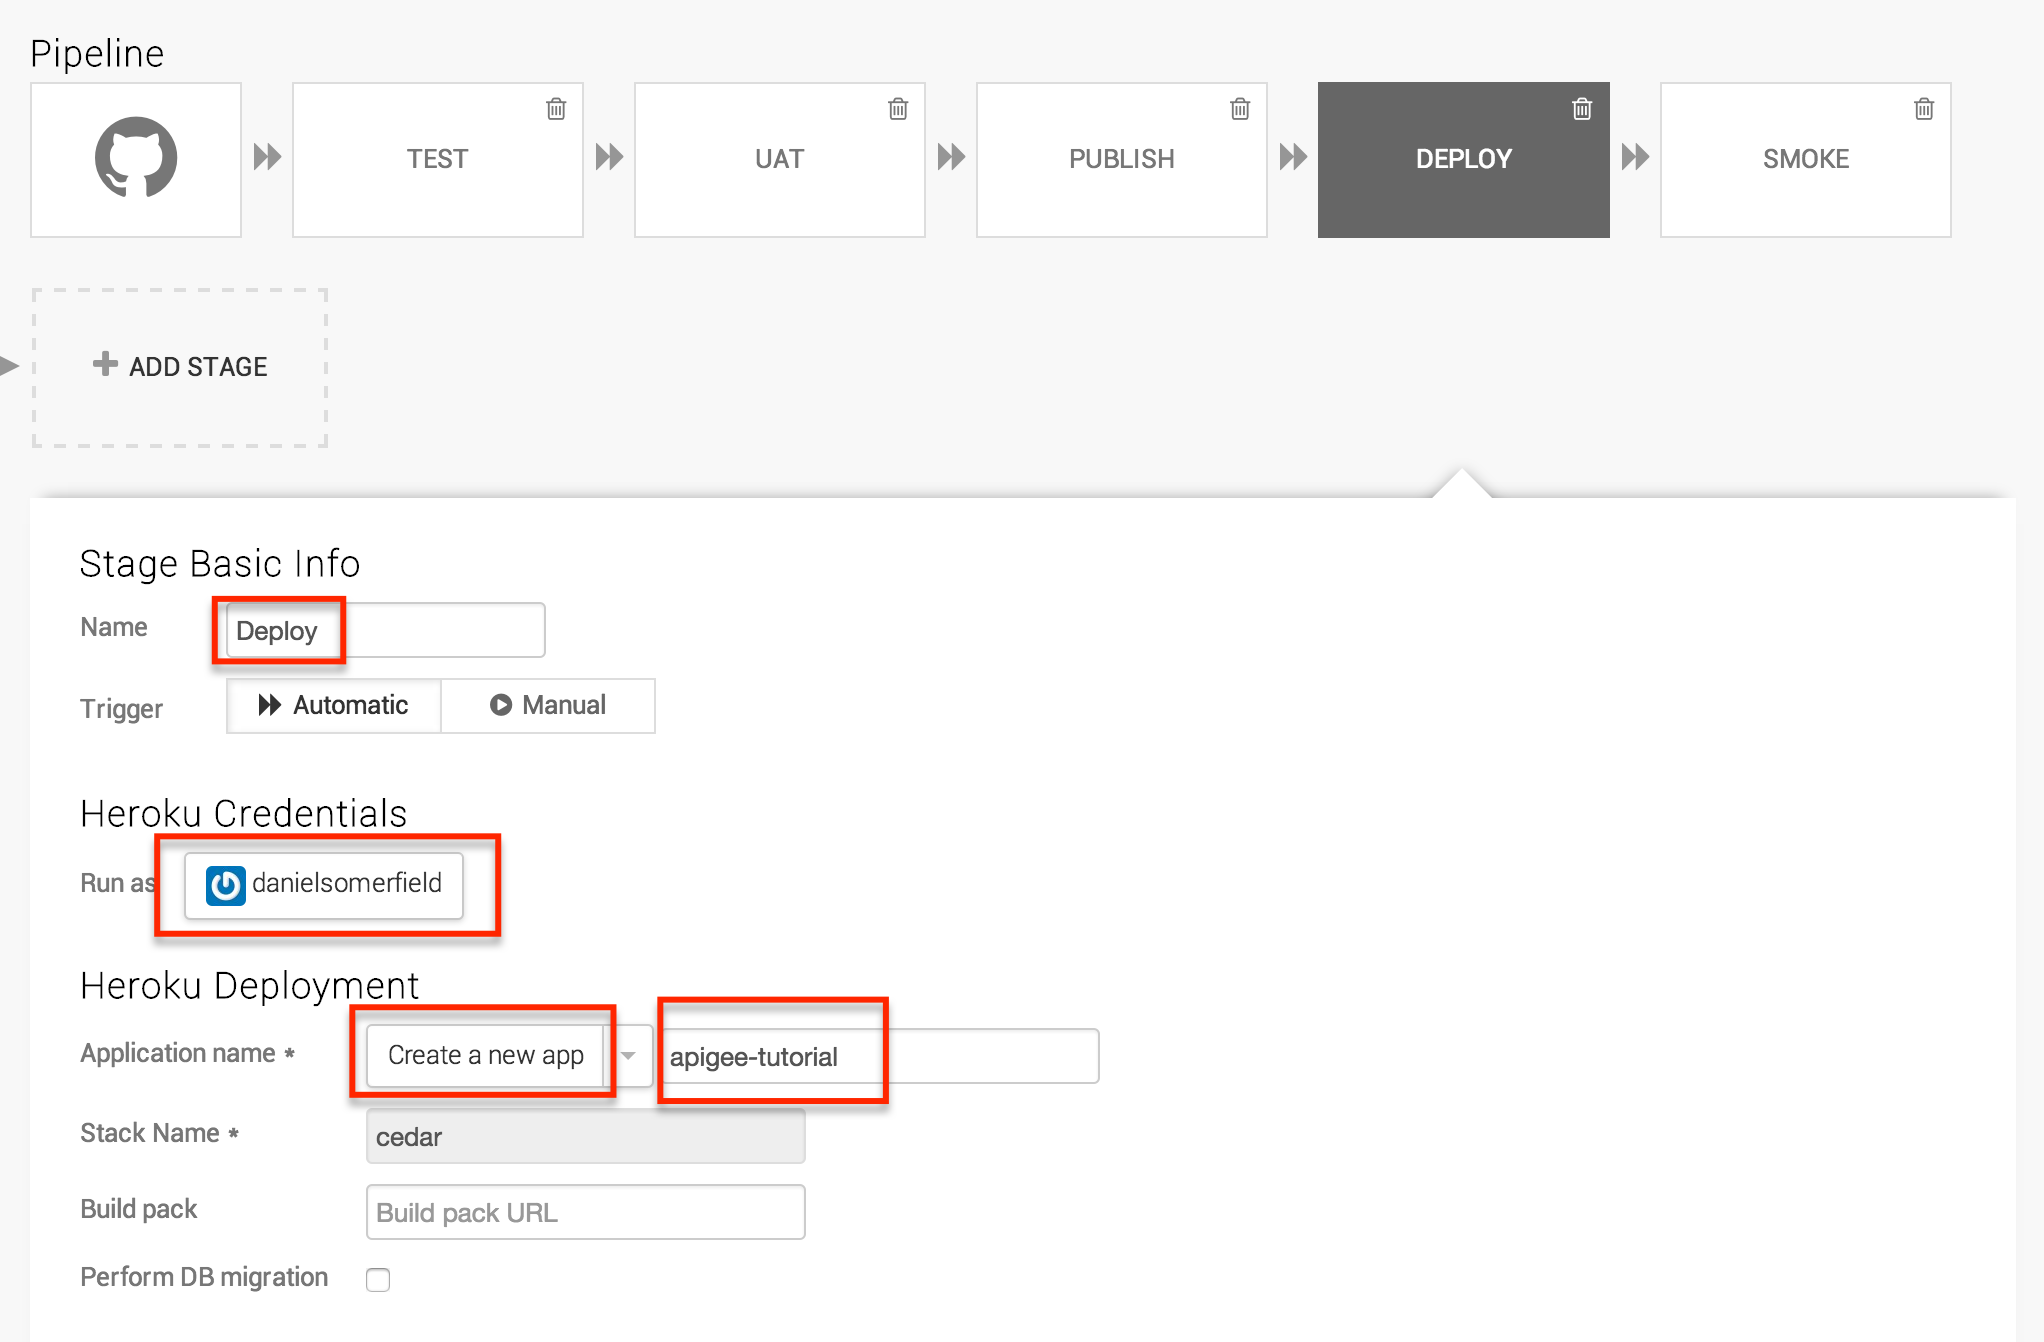
Deploy Step
The deploy step works a little differently. When you create the stage, you will want to click the Deploy tab and select Heroku / Basic. Choose your Heroku credentials at this point and you will be able to choose an application name. If you went off the trail a bit and created one, you can choose it here. Otherwise, select Create a new app and call it something that means something to you. You probably won’t be able to use “appigee-tutorial” because, well, I have it and the app name is where the host name comes from. The stack should be “cedar”, the only supported option at the time of writing this tutorial.
Save the changes, you have your full deployment pipeline in place. Immediately the pipeline will kick off a build and if all went well you will have something in “production”. You can test it manually by hitting the end point at “http://YOUR_APP_NAME.herokuapp.com/hello/?name=Bob”. If you see the JSON response, it worked.
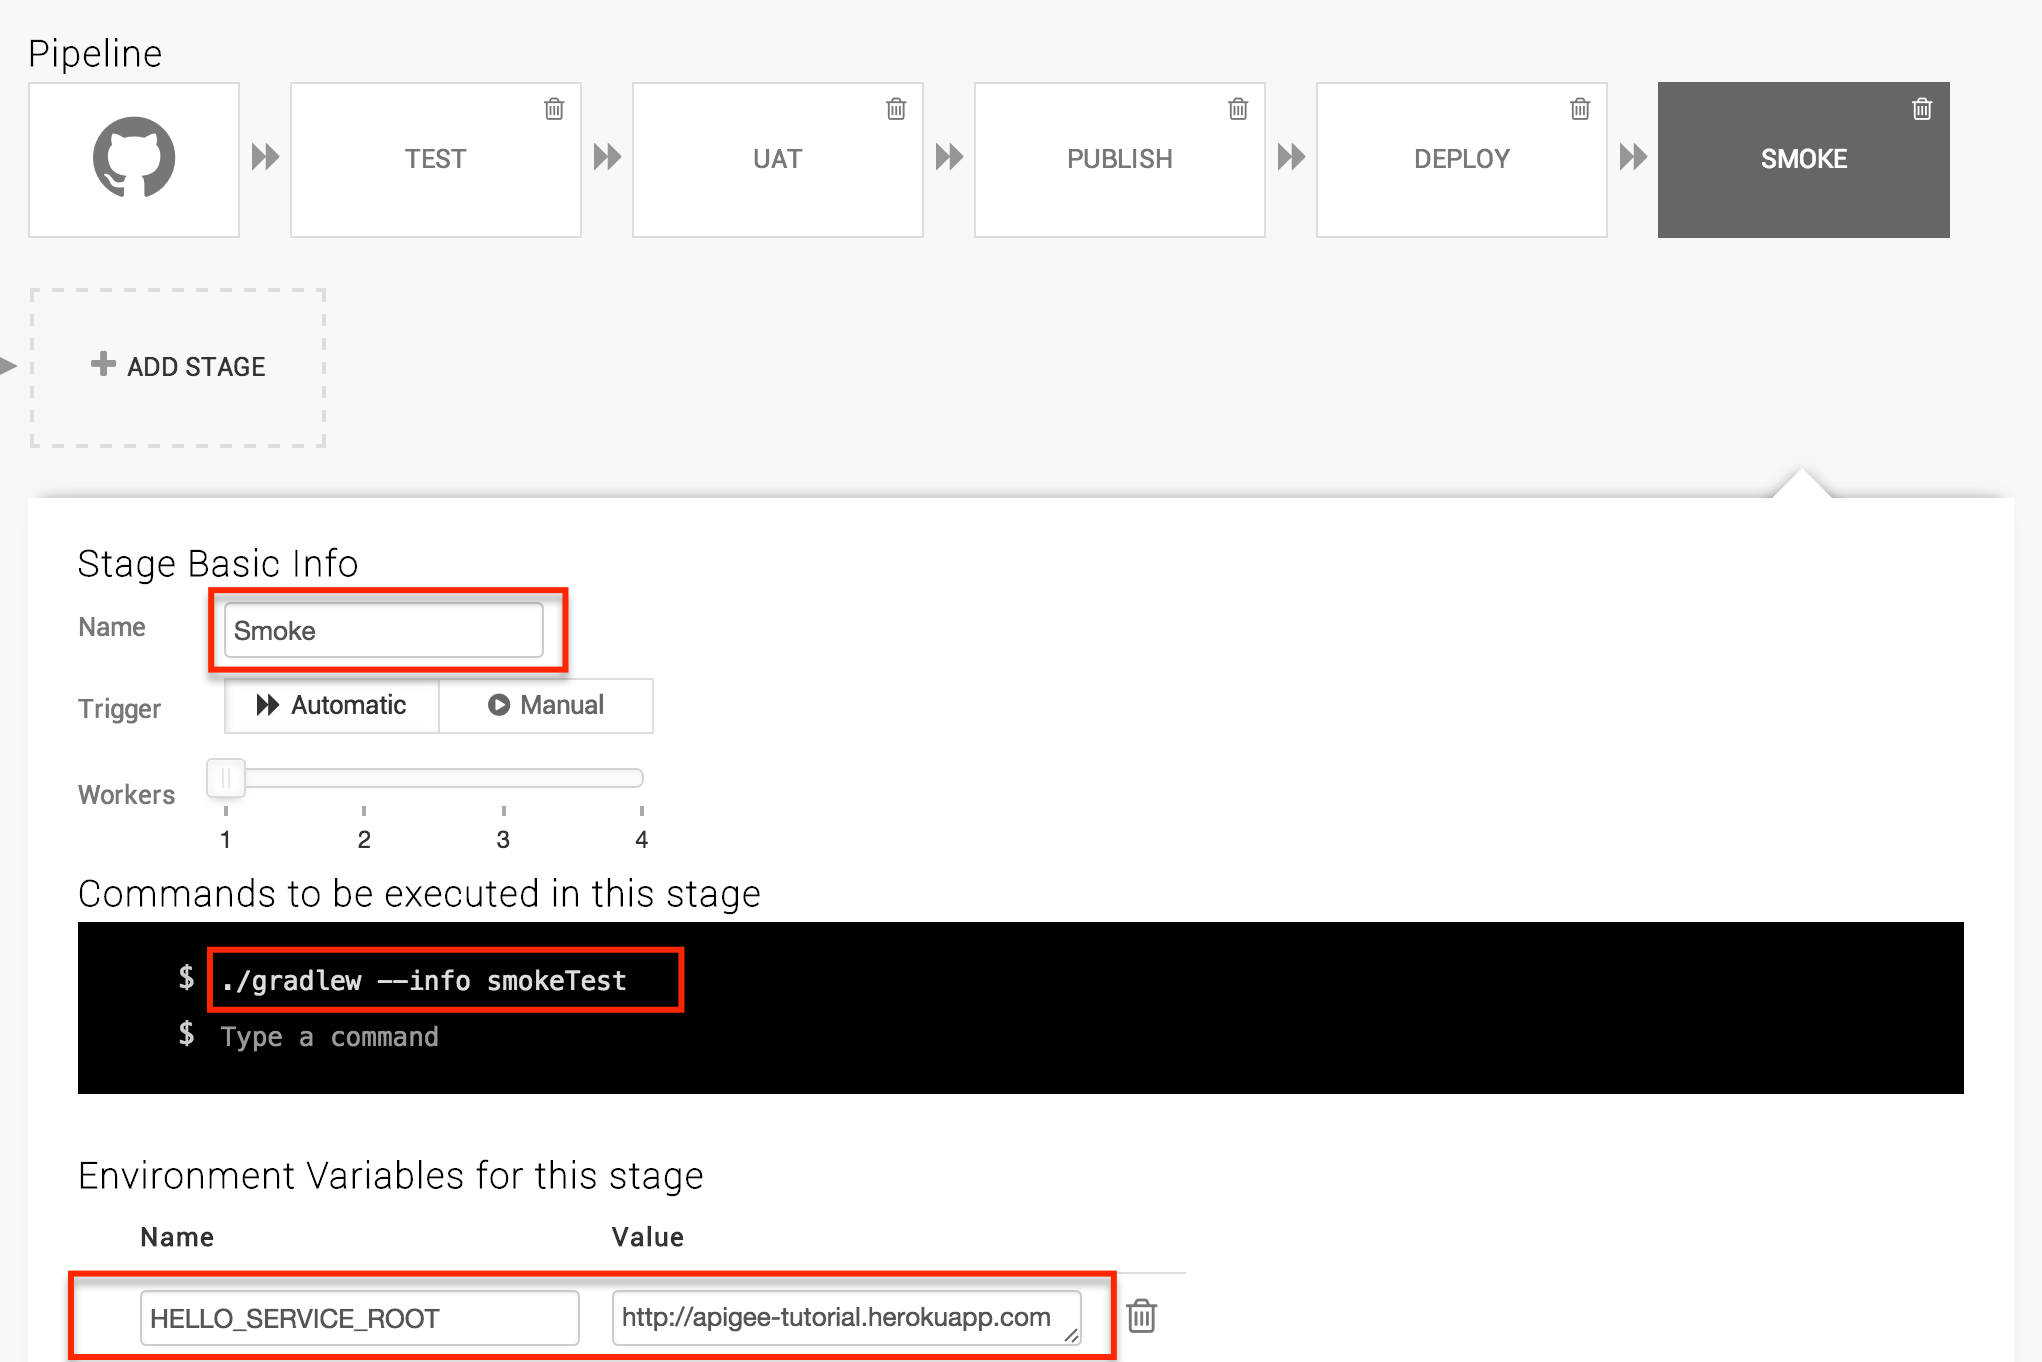
Smoke Test Step
The final smoke test step is super simple. Just create one final step named “Smoke” with the following command ./gradlew --info smokeTest, create the HELLO_SERVICE_ROOT environment variable with the value “http://YOUR_APP_NAME.herokuapp.com”
You’re done. Now the tests will run and (hopefully) your pipeline will be green. If something is misconfigured, the pipeline will catch it. If your code is broken, the pipeline will catch it.
Now that we have a stable pipeline, we can start writing more features. Next we’ll put an apigee API endpoint in front of our app.
Continue to “Section 6: Apigee Deployment”
Getting the Source
Source code for this section can be cloned from GitHub with the command:
git clone https://github.com/danielsomerfield/apigee-tutorial.gitgit checkout automated-deployment